Saturday, December 22, 2012

Christmas Despite the Chaos

I was advised by many that I should avoid decorating this year, due to all of the remodeling chaos.  I couldn't resist.  There needs to be some normalcy during upheavals, so I went ahead with the Christmas decor.  We did not buy a real tree this year, which I miss.  Instead, I decided to decorate smaller table top trees around the house.  Here are some photos of my Christmas decor for 2012.  I share these not because I think I'm an incredible decorator or anything like that, I just love doing it and having people over, and with our remodel, we won't be having people over this year.  Here it goes . . .
Kitchen at Christmas.  Some of favorite resources for Christmas dishes are Orsen Gygi, Pier 1, and Home Goods.

This cabinet is from Dixboro General Store in Ann Arbor, Michigan.  The pale blue cabinet is from The Finer Consigner.  

I didn't put a big tree in the family room this year, because our basement has become our garage storage and our new  Dream Arcade machine (my 40th Birthday gift) is sitting in the usual tree spot. 

Another view of the family room looking into the kitchen.  The striped chairs were my husband's grandparents that we recovered.  The triple wreath is Martha Stewart from Grandin Road, if I remember correcty.

I love my red hutch, especially at Christmas time.   It was purchased from Wood We Ever, striped curtains are Pottery Barn.

Dining Room

I love my reindeer Christmas Quilt.

I still need to remove the plastic from my two new lamps, found at Home Goods.

This is another of my favorite "heirlooms."  It was a pink velvet chair from my husband's grandparents that I recovered in this fun fabric.  

Living Room mantel with some of my Nutcracker collection.  I didn't take all of my boxes out this year because of the remodel.

This black piece was from Wood We Ever and the painting is of Wheeler Farm in Murray.

I love this shelf from Dixboro General Store.  

The large black hutch is also from Dixboro General Store and I've filled it with my collection of Lennox Christmas China, mostly purchased on sale at Macy's and Home Goods.

This view is looking into our library, our addition from 2 years ago.  Its fast become one of our favorite rooms in the house.

I didn't buy a real tree this year, so we used our artificial tree that usually sits in the family room.    The green, red and white ribbon is from TaiPan.

Here's a view of the mantel and my favorite red leather chairs.  

I tried to keep the library shelves simpler this year--I know, I know--simple is not really my way.

We've never had matching stockings, but collect them over time.    The mirror above the mantel is from Pottery Barn and the chandelier from Restoration Hardware.


I thought this rustic piece from Pottery Barn would be perfect for displaying Christmas mugs.  The small tree has all Santa and stocking ornaments.

Small tree in the living room.

The dining room tree has chickens and eggs for its theme.

Both the black shelf and pie-safe are from Dixboro General store.

Here's a view of my messing dining room table, that has become wrapping central this year.    We have both leaves in the table from Thanksgiving and I haven't put the red slipcovers on the chairs yet--it may have to wait until next year.

Another view of the kitchen nook.

My family room tree is covered in mini sweaters and hats, plus a few other items of clothing.  The sweaters are from Garnet Hill.

I've loved this red barn wood window for years.  An inexpensive Santa and spray from Michael's  add character to a high shelf.

I love this little piece from Wood We Ever and the tall red house is numbered drawers  used as an advent calendar.

I kept the entry way simple this year.

I love paintings and photos of barns.  Lang calendars are my favorite.

A kitchen detail:  The plate rack holds $1.99 star plates from TaiPan.  The cookie jar was from Orsen Gygi.

Well, that's a little tour of my Christmas house this year!

Merry Christmas and Happy Remodeling from a Serial Remodeler

I am terrible at keeping up on my blog, but since its the holidays, and we're, once again, in the midst of a BIG remodel, I thought I'd post some pictures and explain what this next project entails.  Later, I'll document my lamentations and trials of remodeling, but I'm trying to keep positive with the holidays here.  I'll begin with photos of what my neighbors have lovingly dubbed "Hurricane Nicole."

Our house before the newest remodel

Hurricane Nicole hits.  I had forgotten how destructive remodeling and additions can be.

The 3rd car stall, when complete, will have a storage area at the back and an addition above it for the master bedroom closet.
This is the storage area at the back of the garage.  To save some cash, we decided not to demolish the stone and stucco on the interior.  


Here is a front few.  The drive-way was cracked and needed to be redone.  The concrete inside the garage was also demolished after finding that the base underneath was about 1 1/2 feet of sand.   No wonder the inside had settled unevenly and created pools of water in the garage.  You can begin to see the upper addition taking shape.
This beautiful, huge beam was needed to add above the garage.  We are going to stain it, rather than cover it since its beautiful wood.

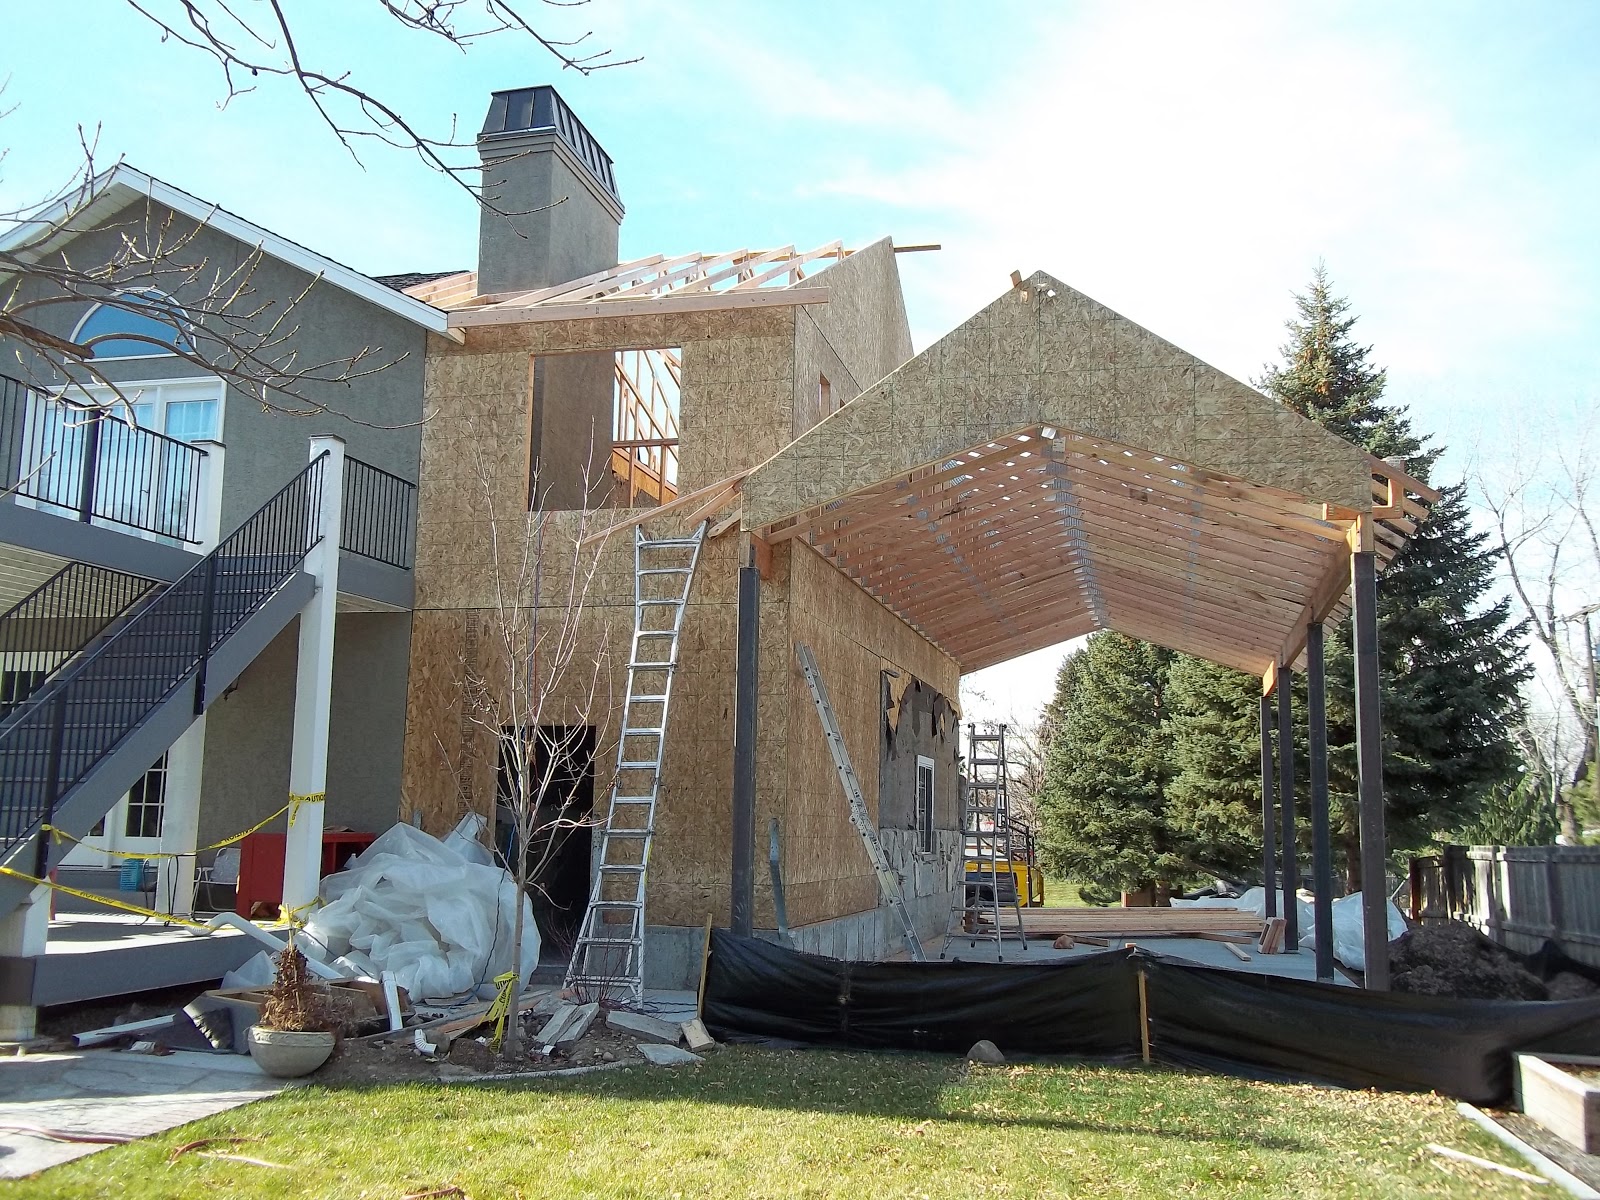
This is the back view of the addition.  The door is to the garage storage, above will be a small sitting room in our master bedroom that gives us access to our new walk-in closet.  Biggest plus, the mountain views from that upper window are incredible.

I'm sure when these beams went up, the neighbors were scratching their heads wondering what we were going to be building.  Our former RV will now become a covered parking for our boat.

Some details:  notice the 3 small windows at the top of the structure.  They add character and light to our new sitting room.
Here is a rear view of the boat parking and roof lines.

Here's a front view of the new addition.  Those tall poles will replicate the white pillars on the porch.  I love the arch and cupola on the boat parking.

We lost our bedroom in this addition.  We kicked our son out of his basement bedroom.  He was sleeping on a mattress on the family room floor until about a week ago, when we finished carpeting an upstairs bedroom for him.  Its been a bit chaotic around here, but I think it'll be worth it in the long run.

Demolition began right around Halloween, and I think we're several months away from completion.  Since taking these photos, I dropped and ruined my camera, so I haven't documented the concrete and roofing that are now finished.  We also have plumbing and electric started, so its coming along.  Here's to a peaceful holiday to anyone who may actually read this!


Saturday, June 23, 2012

Phase 2

Wow, I am really a terrible blogger. So inconsistent . . . but today I googled myself (embarrassing to admit, but I've never done it and I wondered . . .) and this blog came up, along with a photo someone used for their own blog, in choosing a color for their home. Alas, my exterior home color, Copley Gray by Benjamin Moore was not chosen, but still . . . I haven't kept up on this blog, yet we are about to begin phase 2 of our home remodel. After scrapping the initial plans, and the initial builder, today I officially turned in my contract to the builder. From here, we'll wait for the county and the bank, etc. before we can begin. It seems like every time I get to this point, I have second thoughts about what I'm getting into. Do I really want to live through the mess and chaos again? Can I handle the lack of privacy, and this time, a lack of parking space and a bedroom? Am I sure I don't want to move to Holladay in a new house and neighborhood closer to Pete's work? Funny story, how I started thinking about moving to Holladay again. Pete and I were joking with one another about how we should defy burial conventions, and be buried in separate cemeteries. He said he'd have me buried in Holladay since I'd always wanted to move their during my life, which got me thinking, why wait until I'm buried? So . . . I found a house I liked, took a look, made Pete take a look, low-balled an offer that was denied, and find myself back to remodeling my existing house. (I know, I know . . . what would it be like to have such problems?) Am I perhaps, a bit too flakey for my own good? Yes, I'll admit it, AGAIN, this is a sickness for me. I am an idea person. I love thinking about the possibilities, and every once in awhile, I feel compelled to act on those possibilities. I will also reiterate that its a good thing this is not the case in my personal relationships, namely with my husband. If I was looking to change my personal relationship (i.e. marriage) as often as I contemplate moving, I'd be with someone new every 6 months, and that may be a long estimate! Anyhow, the next phase will include another addition, this time more substantial than the last, in that its mostly above ground. We will gain significant garage storage space for bikes, snow plow, lawn mowers, etc., as well as a larger mudroom and small food storage/pantry on the main floor. Most of the changes will occur on the second level. We will gain a new master bath and closet, 2 bedrooms and another small bath. We are changing the location of the entrance door to our bedroom and replacing the existing french doors to the back deck with new, hopefully better insulated french doors. A big portion of this remodel will include changing our furnace and air conditioning units to more environmentally friendly, efficient models. I'll try to keep the blog updated, but clearly I'm not good at that, so I won't make any promises. In other home news, I am loving gardening this year. I've added several roses and perennial flowers to my beds since last year. I've also planted a garden with green and yellow peppers, tomatoes, green onions, raspberries, strawberries, pumpkins, zucchini and yellow squash, and believe that's it. So far, I've got tomatoes starting and saw my first green pepper today, but I'm skeptical of the berries--the plants aren't looking so good. I'd love any suggestions from fellow gardeners on the best way to help the strawberries and raspberries along. I've been told strawberries should do well, so my confidence is waning!! Hope to post pictures next week!

Wednesday, December 21, 2011

Since its December . . .


I thought I'd post pictures from July/August, 'cause that's how I roll. This summer, we were able to finish the landscaping on our yard. It's been so nice to have our yard for the kids, and its amazing how much cleaner the house stays when your yard isn't a dust bowl. Here's a few photos to show the finished product.


Well, almost finished . . . at least for now! (I know, its a sickness, but it makes me happy!)

Thursday, June 16, 2011

Thinking Outside the Box

My cute friend Mel suggested that I share what I've learned through this remodeling process, as well as things I'd do differently. I have a confession to make, I love change. Since I was a kid playing Barbie's, I've liked changing furniture around. I'm not that different now, only the scale of the furniture is much larger and more likely to cause back injuries. There have been many changes throughout this process, beginning with narrowing down the remodel plans, and more recently, rethinking the way I use my new space to function best for our family and the way we entertain.

The plan for my remodel changed from my original, ridiculous idea that was too huge and expensive. Narrowing down the plans forced me to think about how I wanted the spaces in my home to function. Instead of doing an addition off the back of my house, and enlarging the family room, I decided that I'd prefer a space off the front of my home. This decision was based on the fact that, one, I like my cozy family room and the size of the back yard, and two, my front yard was large and my house had no windows to the front. My original desire was to gain a cold storage space and exercise/bedroom below ground and a bigger, usable porch, and front office/library space.

The new addition houses a wall of bookshelves that I love, but I realized that the desk at the front of the house, was too far away from me when I was cooking. The kids ended up doing homework in the dining room next to the kitchen, but there was still the mess of the desk at the front of the house. I had my piano in my old living room and a sitting room next to our new, double-sided fire place. My dining room table was new and originally intended for the original remodel plan, where I'd move the dining room to my old living room. The table worked without the extension leafs, but as soon they were added for big family dinners, it was difficult to maneuver around the dining room.

A few months ago, I decided to think outside of the box and make my existing dining room into the office/study area. Its still a work in progress, but the space works much better for containing messy mail and homework, and keeps the front two rooms better organized. My old living room became the dining room with a sitting area near the fireplace and window seat. I used soft chairs and benches to make the room more comfortable and approachable, not just a dining space. The new addition now has the piano and a cozy seating area. Its great for quietly reading, piano practice or guitar playing. When we've had family party's, with the table extended (shown in the photo), we can play two separate games of "Ticket To Ride" and still visit with one another. Plus, people actually walk into the new space. It may be unconventional, but it works well for our family and the way we live.

New Dining Space in former Living Room


Former Dining Room, still a work in progress, but now functions as an office/study space with our computer desk, study/game table, and a second desk for craft projects, etc.


View from dining space into the new library/sitting room/music room area. The space is used more often with this arrangement.


Another view of the dining area from the entry way, with both extensions in the table. You can see how much more space we have to sit around the table for dining or game playing.

Progress At Last

Our latest remodel project has been to fix the yard that we destroyed in our remodel last year. An obvious downside to building an addition, is that you destroy your yard in the process. We've saved bonuses this past year to redo the yard. Another thing we've learned is that everything is always more expensive than you anticipate. Plus, self-discovery, I have a tendency to want to "do it right." Doing it right entails figuring out the entire project so that we can do it in chunks that work with our budget and will prevent us from paying too much in the long run. Its not always seeing to figure out the best way to proceed when you have a budget, but big plans and can't do everything at once. Here are some of the photos of the back yard and side yard in progress. It is still a complete mess, but its coming together slowly. Hopefully, by Monday, we'll see more progress since the landscapers are coming to grade the yard and redo our sprinklers--yep, we destroyed those too. Here's a few photos to see the project as it nears completion. I really hope this turns out as well as the addition did. I didn't hire a landscape architect, but instead did the design myself. Knock on wood for me . . .

Project #1: Patios, both cement and stone.
We moved our shed to the back corner of our yard, where we had our contractor build a cement pad with a ramp for the lawn mower. We had to remove aspen trees, but opted to keep the big blue spruces.

This stage of the project also included a stamped, colored patio off the back of the house. We had a brick wall built to hide the A/C unit, although the sound is still obnoxious when the A/C is on. We also trimmed the window ledges with matching brick. The same brick was used on the front of the house and I hope to use it on an outdoor fireplace in the next couple of years. The next two photos show the progress of the patio.


Project #2: Trimming the Trees. Living in a desert has many advantages, but big, green trees is not one of them. Thankfully, we live in an area where we have big, older trees. Unfortunately, our trees were misshaped and filled with dead branches. We have 10 large blue spruces and a large ash tree that we had trimmed. Notice the damage all of the big trucks have done to the lawn. We will have to completely rip out all of the grass and start over with new sprinklers and sod.

In the back ground of this next picture, you can see the results of the tree trimming. This photo also shows our completed fence to the left, our rock wall surrounds the basement walk-out, and the few measly plants that my husband and I spent hours planting, due to the huge boulders that lie just under the surface of the dirt. We had struggled with the idea of spending so much for a landscaper, until it took us approximately 3 1/3+ hours to plant those few plants. When we realized we couldn't do it ourselves, it was easier to hand over the check.

This photo also shows our stone/brick patio that we build using left-over stone from the front of our house after the remodel. This may be one of my favorite aspects of our backyard, it definitely adds character and has a connection to our home's past. I love that the stone was reused in this way.

Thus, Project #3: The Fence. We chose to go with a 4 ft. fence along the drive-way of our neighbors, that becomes a 5 ft. fence in our backyards. Our fence has the look of rod iron, but its powder-coated steel. A great, sturdy fence but a fraction of the cost. This picture shows the workers building the fence.


Project #4: Destroying the RV Pad. This is one of those necessary projects that costs more now, but will save us money in the future. Our plan, eventually (hopefully next summer), is to tear out our old drive-way, lower it a foot, so that we can have 8 ft. garage doors. By pulling out the RV pad now, we can get the backyard elevation right, without having to tear out the drive-way. Plus, we can use the soil under the old RV pad to help raise the level of the lawn out back. I'll have to take a picture of the stack of cement out front . . . its impressive!


Project #5: This has not been completed yet, but after our deck was put on last year, we were not sure what level the patios would be since we couldn't afford to put them in yet. So, we ended up with "drop-off" steps. I do love that we added stairs down from the second level deck. I think its a good fire escape option, plus it makes that deck so much more usable. Anyhow, here what the back of house looks like now. The patio tables are hand-me-downs from Janae and friends in Michigan, the chairs were on sale for $25 each at Target. I loved them because they're stackable. I figure that makes for easier winter storage. Maybe I'll buy a few more next month . . . we'll see what the budget allows!


Unexpected Project: When we tore down the old fence to put up the new one, we realized that our neighbors shed was using our old fence for support. There was a shed, rocks, a chain-link fence, all standing on an unsupported two feet of soil. Originally, Pete was going to do this project and the trampoline project, but as usual, they turned out to be more time consuming and difficult than we'd thought. Anyway, I think it turned out pretty nicely for a retaining wall. We plan to plant hostas under the pine trees for a more dense foliage look.


Project #6: Moving the Playground and Burying the Trampoline. Our trampoline was originally facing north, but it was taking up the space that I wanted for the trampoline. We had the playground turned and moved closer to the trees, then buried the tramp next to it. Our attempt to bury the tramp cheaply is still not a done deal. We are hoping our solution will work, after a few tweaks. Our contractor is going to backfill gravel up the sides of the tramp like a bowl, in hopes of keeping the circular frame in place. After a heavy rain, we did have the frame collapse. I think it'll work, we'll find out tomorrow. We need to trim the shrubs next to the tramp, that'll happen next week. Then, after the ground is leveled, we'll have special playground woodchips to surround the play area. I hope it works!


I'll try to post pictures as the project progresses still further. The hope is that our yard will be usable in the next few weeks. I'm hoping to do a lot of planting myself, but with all the rocks in the soil, I'm grateful to have landscapers prepare the beds. Happy Landscaping!

Friday, May 27, 2011

One day, hopefully soon, I will update this blog . . .

I hope. It seems like a luxury to have that time. Here's a great recipe though, until then.


Warm Strawberry Cupcakes Baked in a Teacup
Submitted by Nicole Fisher from “Cupcakes” by Susanna Tee

Ingredients:
8 Tbsp. butter, softened, plus extra for greasing
4 Tbsp. Strawberry preserves
Generous ½ cup of superfine sugar
2 eggs, slightly beaten
1 tsp. vanilla extract
Generous ¾ cup self-rising white flour
1 lb. small whole strawberries
Confectioners’ sugar for dusting

1. Preheat oven to 350 degrees. Grease six heavy round teacups (or Ramekin) with butter. Spoon 1 to 2 tsp. of strawberry preserves in the bottom of each teacup.
2. Beat together butter and sugar until light and fluffy. Gradually add eggs, beating well, and then add vanilla extract. Sift in flour and, using a large metal spoon, fold it into the mixture. Spoon the batter into the teacups.
3. Stand teacups in a roasting pan, then pour in enough hot water to come one-third up the sides of the cups. Bake the cupcakes for 40 minutes, or until well-risen and golden brown, and a skewer inserted in the center, comes out clean. If over browning, cover the cupcakes with a sheet of foil. Cool for 2 to 3 minutes, then carefully lift from the pan and place on saucers.
4. Place a few of the whole strawberries on each cake, then dust with confectioners’ sugar. Serve warm with remaining strawberries.

Bon Appetite!